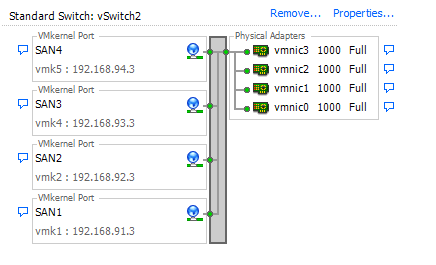
A while ago I build a new NexentaStor server to serve as the home lab SAN. Also picked up a low latency Force10 switch to handle the SAN traffic (among other things).
Now the time came to test vSphere iSCSI MPIO and attempt to achieve faster than 1Gb/s connection to the datastore which has been a huge bottleneck when using NFS.
The setup on each machine is as follows.
NexentaStor
- 4 Intel Pro/1000 VT Interfaces
- Each NIC on separate VLAN
- Naggle disabled
- Compression on Target enabled
vSphere
- 4 On-Board Broadcom Gigabit interfaces
- Each NIC on separate VLAN
- Round Robin MPIO
- Balancing: IOPS, 1 IO per NIC
- Delayed Ack enabled
- VM test disk Eager Thick Provisioned
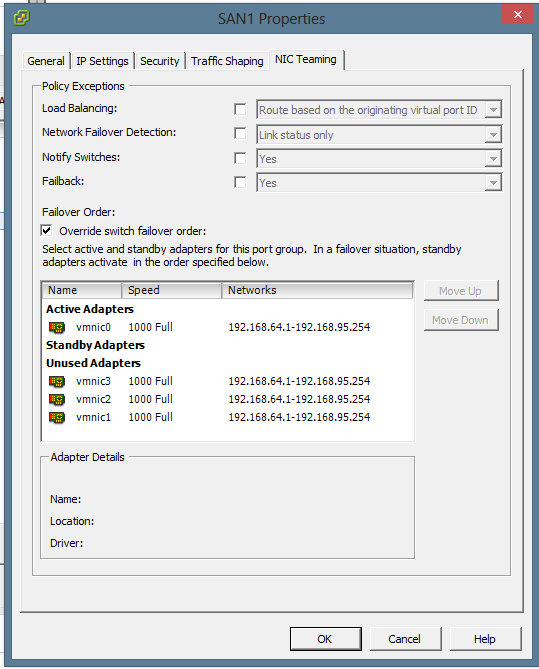
Network on vSphere was configured via a single vSwitch though pNICs were assigned individually to each vNIC.


Round robin balancing was configured via vSphere and changed the IOPS per NIC via the console
~ # esxcli storage nmp psp roundrobin deviceconfig set --device naa.600144f083e14c0000005097ebdc0002 --iops 1 --type iops
~ # esxcli storage nmp psp roundrobin deviceconfig get -d naa.600144f083e14c0000005097ebdc0002
   Byte Limit: 10485760
   Device: naa.600144f083e14c0000005097ebdc0002
   IOOperation Limit: 5
   Limit Type: Iops
   Use Active Unoptimized Paths: false
Testing was done inside a CentOS VM because for some reason testing directly in vSphere Console only results in maximum transfer of 80MB/s even though the traffic was always split evenly across all 4 interfaces.
Testing was done via DD commands
[root@testvm test]# dd if=/dev/zero of=ddfile1 bs=16k count=1M
[root@testvm test]# dd if=ddfile1 of=/dev/null bs=16k
The initial test was done with what I thought was the ideal scenario.
| NexentaStor MTU | vSphere MTU | VM Write | VM Read |
| 9000 | 9000 | 394 MB/s | 7.4 MB/s |
What the? 7.4 MB/s reads? Repeated the test several times to confirm. Even tried it on another vSphere server and new Test VM. Doing some Googling it might be MTU mismatch so let’s try with standard 1500 MTU.
| NexentaStor MTU | vSphere MTU | VM Write | VM Read |
| 1500 | 1500 | 367 MB/s | 141 MB/s |
A bit of loss in write speed due to smaller MTU but for some reason reads are only maxed at 141MB/s. Much faster than MTU 9000 but nowhere near the write speeds. Definitely MTU issue at work when using Jumbos even though the fact that it’s limited to 141MB/s in reads still doesn’t make sense. The traffic was still evenly split across all interfaces. Trying to match up the MTU’s better. Could it be that either NexentaStor or vSphere doesn’t account for the TCP header?
| NexentaStor MTU | vSphere MTU | VM Write | VM Read |
| 8982 | 8982 | 165 MB/s | ? MB/s |
Had to abort the read test as it seemed to have stalled completely. During writes the speeds flactuated wildly. Yet Another test.
| NexentaStor MTU | vSphere MTU | VM Write | VM Read |
| 9000 | 8982 | 356 MB/s | 4.7 MB/s |
| 8982 | 9000 | 322 MB/s | ? MB/s |
Once again had to abort reads due to stalled test. Not sure what’s going on here. But for giggles, decided to try another uncommon MTU size of 7000.
| NexentaStor MTU | vSphere MTU | VM Write | VM Read |
| 7000 | 7000 | 417 MB/s | 143 MB/s |
Hmm. Very unusual. Not exactly sure what the bottleneck here is. Still, definitely faster than single 1Gb NIC. Disk on the SAN is definitely not the issue as the IO never actually hits the physical Disk.

Another quick test was done by copying a test file to another via DD. The results were also quite surprising.
[root@testvm test]# dd if=ddfile1 of=ddfile2 bs=16k
This is another one I didn’t expect. The result was only 92MB/s which is less than the speed of a single NIC. At this point I spawned another test VM to test concurrent IO performance.
The same test repeated concurrently on two VM’s resulted in about 68MB/s each. Definitely not looking too good.
Performing a pure DD read on each VM did however achieve 95MB/s per VM so the interfaces are better utilized. Repeating the tests with MTU 1500 resulted in 77MB/s (copy) and 133MB/s (pure read).
Conclusion: Jumbo Frames at this point do not offer any visible advantage. For stability sake sticking with MTU 1500 sounds like the way to go. Further research required.

HI there
I am setting up similar setup for my home lab environment
Nexenta community edition, however, i can’t set the MTU on the VM.
Modified /kernel/drv/e1000g.conf to
MaxFrameSize=0,2,2,2,2,2,2,0,0,0,0,0,0,0,0,0;
and modified /etc/hostname.e1000g1, g2 to
admin@nexentor:~$ cat /etc/hostname.e1000g1
192.168.3.20 netmask 255.255.255.0 mtu 8000 broadcast + up
However, it always stuck on 1500 MTU
e1000g1: flags=1000842 mtu 1500 index 3
inet 192.168.3.20 netmask ffffff00 broadcast 192.168.3.255
e1000g2: flags=1000842 mtu 1500 index 4
inet 192.168.3.24 netmask ffffff00 broadcast 192.168.3.255
Just wondering how you setup the MTU in nexenta??
Thanks
Kris
Hi Kris, i know this is probably a bit late but here goes.
Always always set a checkpoint before reconfiguring anything.
Here is how you do that.
nmc@Nexenta01:/$ setup appliance checkpoint create
This is the result
Created rollback checkpoint ‘rootfs-nmu-001’
Now, this checkpoint is created and still set as the active one. So upon reboot it will boot into this checkpiont by default. Lets look at this as save points :).
Now that you have created your checkpoint lets look at reconfiguring your NIC’s.
In my scenario I use broadcom nic’s so I had to do the following.
nmc@Nexenta01:/$ setup network interface
Option ? e1000g1
Option ? static
e1000g1 IP address : 10.0.0.100
e1000g1 netmask : 255.255.255.0
e1000g1 mtu : 1500
Enabling e1000g1 as 10.0.0.100/255.255.255.0 mtu 1500 … OK.
At this point it will tell you that it might require driver reload to enable the new MTU value.
But you are not done yet. Usually in my experience you will see two different MTU values in the NMV and the NMC. might just be my setup so lets not get too held up on that.
Now, like before lets create a post change checkpoint using the same command.
nmc@Nexenta01:/$ setup appliance checkpoint create
This is the result
Created rollback checkpoint ‘rootfs-nmu-002’
Take note of the checkpoint increment at the end.
Now, set this as the default checkpoint
nmc@Nexenta01:/$ setup appliance checkpoint
Option ? rootfs-nmu-002
Option ? activate
Activate rollback checkpoint ‘rootfs-nmu-002’? Yes
Checkpoint ‘rootfs-nmu-002’ has been activated. You can reboot now.
When you reboot, boot into the latest checkpoint ( the one that ends with 002 ) and then select yes after that.
Now that the checkpoint is active you will most probably see that it says (All the nics that you are trying to change the MTU on) unable to configure network adapters. Now, we need to do the following.
In my scenario like I mentioned I use Broadcom NIC’s. So I have to go and find the following configuration file.
bnx.conf
First we need to enter maintenance mode
nmc@Nexenta01:/$ option expert_mode=1
nmc@Nexenta01:/$ !bash
You are about to enter the Unix (“raw”) shell and execute low-level Unix command(s). Warning: using low-level Unix commands is not recommended! Execute? Yes
root@Nexenta01:/volumes#
Here is how to find it. (depending on your hardware you use you might want to google which config file you are looking for.
root@Nexenta01:/volumes# cd
root@Nexenta01:~# cd /kernel/drv
root@Nexenta01:/kernel/drv# vim bnx.conf
Now look for the following string.
#mtu=1500,1500,1500,1500,1500,1500,1500,1500,1500,1500,1500,1500,1500,1500,1500,1500;
Simply uncomment this string if you have a MTU of 1500 or you need to use notepad to find 1500 and then replace it with the new MTU you want to set.
We are almost done here.
Now, you need to create another checkpoint and then activate it like we did above. Reboot into the checkpoint and the error will be no more.
Kind regards,
Johan